Look at all the goodies I just received this week! I can't wait to sit down and play with all of this crafty goodness! I have so many ideas flying through my head, hopefully they look as good on paper as they do up there! I'm very excited to play with the new clay and flower molds, and I have some really cool ideas for stamp club too. Some of it was free too, have to say that's the best part : )!
Saturday, June 8, 2013
Lollipop Bouquet
As I was typing this title, I had a flashback to Mrs. Marling from the 5th grade! Bouquet was one of the words in our spelling test, and I missed it, so Mrs. Marling gave me the task of creating a bulletin board for the word. To this day, I think of her every time I write the word!
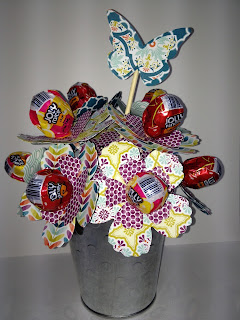
Ok, on to the project! This was a little thank you for the secretary's at Trever's school. I started by cutting my flowers with the SU Fun Flowers die, this is a must have! I love that I can cut multiple layers of paper with one pass. I used the large and small flowers on the die.
I chose two coordinating papers from the Sycamore Street Designer paper. After I cut the flowers out, I used an Exacto knife and cut an X in the center of each flower which allowed me to assemble the flowers on the lollipop sticks without the need for adhesive. I also used my bone folder and curled each petal up to give a little extra dimension.
I cut extra of the small flower and simply added a brad to the center, these were used in between the larger flowers to help fill the "holes" in the bouquet. I used just a drop of Tombow multi-adhesive on the end of the brad, and pushed them into the Styrofoam ball. The container is a small galvanized pail from the Dollar Spot at Target (Love this place!). I used a 4" Styrofoam ball for the project, and simply pushed it down into the bucket and it held without an adhesive. Here's a pic of how I started my assembly of the bouquet. I used Jolly Rancher suckers for the centers, I liked the size, however the UPC code isn't the prettiest!
I also added a butterfly pick to the bouquet just to give it an extra pop. I die cut the papers with the SU! Beautiful Butterflies die. I cut 2 of each size and then used a bamboo skewer and my trusty multi-adhesive!
I did pop dot the center butterfly for some added dimension.
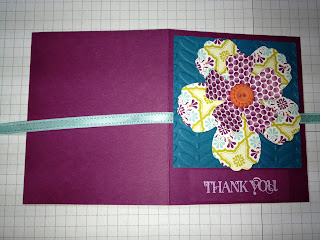
Since these were for adults and most grown-ups do not enjoy suckers, I thought I should add a little chocolate to the mix! I thought it would be fun to make a pocket card to hold my little chocolate bar, and it would also serve as my thank you card too!
I started with a 4 1/4" x 10 3/4" piece of Rich Razzleberry cardstock. I scored at 3 1/2", 7", and 7 1/4". I folded back the section to the right of the last score, and this created my pocket for the chocolate. I then made a diagonal cut across the top of the pocket, added some scalloped trim which was cut from the SU! Tasteful Trim die, and simply used Sticky strip to adhere the side and bottom of the pocket.
For the front, I used a piece of ribbon for my closure, I used a bit of SNAIL to keep it in place, and then added an embossed piece of cardstock measuring 3 1/4" square in Island Indigo. One final flower topped the whole thing off, with a cute Tangerine Tango button for the center. I stamped the thank you from Curly Cute in white ink to finish it off.
Finally have this post finished : ), I've been trying to finish this for several weeks now. Apparently my laptop does not want to save pics from my e-mail to it's hard drive! I even to complete it on my I-pad with no success! I hope attempt to make your own lollipop bouquet, I would love to see a picture of it!
Thursday, March 21, 2013
Tim Holtz Tattered Floral Challenge
Some of you may know I have a bit of a thing for Tim Holtz goodies! Susan and I signed up for an online class last year, and since the class I have added even more to my stash! The challenge was to create a project using the Tattered Floral die in the Tim Holtz Sizzix line. So, I decided I wanted to make a necklace, Tim had shown a beautiful necklace made by Connie Fong. It was displayed at the CHA show in January. Now I have to say this is by no means anything as beautiful as her creation, but I like how it turned out just the same! My little creation is not completely in the Tim Holtz distress style, but I did use some of his techniques.
I started of with some off white muslin, and I cut 4 layers of fabric at once. I love the thicker Sizzix dies because you can cut almost anything! After I cut the flowers, I used Tim's French Market stamp set to add some pattern to the fabric. I stamped the images with Timber Brown Staz-On it had to be a permanent ink because I wanted to use some of the distress stains and paints to add some pretty colors to the layers. Here are my stamped layers and the colors I used to "mottle" the petals.
Here's a close up of the flower layers after I added some color to them. I love how they turned out! Look at the cool postmark!
And, finally a close up of the finished flower on the necklace.
Here's a list of the items I used for my project: Tattered Florals die, French Market stamp set, Peacock Feathers, Picked Raspberry distress inks, and Seedless Preserves distress paint. Idea-ology items: Locket keys, jump rings, philosophy tags, custom fasteners, and baubles.
I can't wait to play some more with all of my new toys! There are a few other items which were revealed at CHA and rumor has it they will be available the beginning of next month, yippee!
Sunday, August 26, 2012
Birthday Card Class
I finally have a card class based on birthdays for you! I hope you love them as much as I do. We'll be using my most favorite tool of all, the Big Shot! We'll be doing some die cutting, dry embossing, and paper piercing. The class will include all of your supplies, with an added bonus of taking home the remainder of 1/2 a container of SU's Vintage Faceted Designer Buttons. I love these new clear buttons, they go with absolutely everything! You will be making 4 different cards and here they are in all their cuteness!


The class fee is $15.00 for all 4 cards and the buttons, and will be held on Monday, September 10th at 6 p.m. I will need your RSVP by Noon this Friday, August 31st.


The class fee is $15.00 for all 4 cards and the buttons, and will be held on Monday, September 10th at 6 p.m. I will need your RSVP by Noon this Friday, August 31st.
Saturday, July 21, 2012
Banner Sneak Peak
As most of you already know, I have been deep in the thralls of preparing for the BIG stamping weekend! I've also been neglecting you all so terribly, I didn't realize it had been SO long since I've posted. So sorry!
So, this is the first letter of my Create banner, it's the newest addition to my stampin' space. I haven't decided if I'm going to draw it out and just show one letter at a time, or if you'll get to see the rest of it at once ; ). I used a paper pack from My Mind's Eye, called Lost & Found Blush. I love the little 6 x 6 paper packs for these types of projects. You have a lot of different patterns to choose from and can usually do most of the project from one pack. The letter itself is from another paper pack from My Mind's Eye as well. The tag is from Papertrey Ink, and the border die is from PTI. As you can see my Big Shot gave me a lot of love for this one!
So, this is the first letter of my Create banner, it's the newest addition to my stampin' space. I haven't decided if I'm going to draw it out and just show one letter at a time, or if you'll get to see the rest of it at once ; ). I used a paper pack from My Mind's Eye, called Lost & Found Blush. I love the little 6 x 6 paper packs for these types of projects. You have a lot of different patterns to choose from and can usually do most of the project from one pack. The letter itself is from another paper pack from My Mind's Eye as well. The tag is from Papertrey Ink, and the border die is from PTI. As you can see my Big Shot gave me a lot of love for this one!
Saturday, March 17, 2012
Inspirtational Art
Britt's birthday was Thursday, and after going to visit her for her graduation, I realized she really needed some artwork for her walls! I had seen a new set of stamps at Taylored Expressions, with 3 different words, Grace, Faith, and Hope. I wanted to make it into wall art, so set about figuring out how to make a set of 3 pieces. This is my original inspiration:
And was translated to this:
I had found a display frame at Michael's which held a CD and the cover art for the CD. It measured 6 1/2" x 12". I needed a frame which would allow me to use 12 x 12 paper for the background, and this fit the bill! I cut the letters using my Sans Serif dies for my Big Shot, and used the oh so cool Twitterpated Designer Papers! I used my dimensionals under the letters, but since the frames were not meant for a lot of dimension, any embellishments had to be added to the top of the glass. I die cut some butterflies and daisies for a little extra somethin'! This was a super easy project, and pretty quick to do once I had decided how to lay it all out. Here is the rest of the set.
Saturday, March 3, 2012
Masculine Card Class is finally posted!
I've posted the final versions of the cards you will have the chance to make at my next class, here's a
little preview....
Go to the Class tab for all the important info!
Subscribe to:
Posts (Atom)


