Tuesday, November 19, 2013

Gift Card & Ornament Set

I've seen tons of these super cute espresso cups all over the blogs I look at!  They are so stinkin' adorable, that I just had to order some and try them out.  I love how they turn out, and I think I can totally take credit for turning the cup into an ornament!  At least, I haven't seen it done yet anywhere else! This is a pic of one/two of our stamp club projects this month:
 
Isn't it adorable?!!  So, we started with a pattern of the outside of the cup, stamped the SU Endless Wishes photopolymer set on it, which unfortunately is no longer available :(, apparently it was very popular.  We used Bermuda Bay, Rich Razzleberry, and Silver Encore ink to stamp the pattern and then adhered it to the cup.  The gift card holder uses the Pop & Place card base, then it's score to create a pocket on the inside.  I think this would make a great gift for teachers, co-workers, you name it!  The cup would be perfect filled with chocolates, or maybe some type of a coffee flavored candy.

Sunday, September 8, 2013

Happy Card Set

The next class I will be holding is for a cute note card set.  The set is packaged in our new chevron bags with a cute embellishment to keep it closed.  The set contains 5 notecards and envelopes, as seen below.  This would make a great gift for someone's birthday, or the upcoming holidays!
The class will take place on Thursday, September 26th at 5:30.  Cost of the class will be $14.00, and includes a package of rhinestones for you to keep after class.  If you would like to make a second set of notecards, just pay an additional $5 and you can take home 2 completed sets!  I will need your RSVP and class fee by Wednesday, September 18th.


Tim Holtz Assemblage Clock

Last weekend while we were camping, I was finally able to work on my assemblage clock.  Most of you know I have a thing for some of Tim Holtz's products, and when I saw this in the Spring, I just knew I had to buy one and give it a try!  I used watercolor paper for the butterfly, and for the background papers.  I felt it would be a better medium to use my blender pen to color in the butterfly and also to create a mottled paper for the background.  I used Pool Party, Island Indigo and Pear Pizzazz for my colors.  The butterfly is a stamp I've had for many years, and love the detail in it.  For the background paper, I used my re-inkers in Pear and Indigo to create a mottled affect with water and a paint brush, and then waited for it to dry, and ran it through my Big Shot with the wallpaper embossing folder.  The finishing touch was using some seam binding with the re-inkers and paint brush again to be sure everything matched.
I also used the swirled flower image from Creative Elements with my white Staz-On to add a little extra to the outside glass.  The unmounted stamp worked really well for this, because I could bend it to conform to the edge of the glass. Below is a close up pic of the glass so you can better see this detail.  It's very pretty in person, there's a lot of bling and sparkle going on!


Sunday, August 25, 2013

Sprinkle of Salt

So far this is my favorite card I completed yesterday!  I love the idea of the salt, but definitely want to try it with a chunkier version next time!  I also think when I brushed on my colors, it should have been watered down a bit more, but still think it turned out neat.

I think it turned out so cool!  This is one of my all time favorite sentiments from PTI, it's the Think Big Favorites #3, love the combo on the fonts!  Add a butterfly with a little bling and voilĂ  you have a cute card! I used SU! colors Strawberry Splash, Crisp Cantaloupe & Coastal Cabana, love these happy colors!

Mixing Mists to Match Challenge

The next challenge I jumped into for Stamp-A-Faire was the mist challenge.  I really love how this card turned out!  I embossed the SU! star available as a single stamp in silver and then mixed my mist which was Midnight Muse and alcohol in a mini mister bottle and spritzed away, I then went back in to add the sentiment with Midnight Muse ink.  Love the sparkle of the glittery silver paper on my layer, but not sure you can really detect it in the pic.  I also added an extra touch with our new SU silver ribbon in the mini cattie.

Saturday, August 24, 2013

Tea Dyeing with Kool-Aid!

First challenge of Stamp-A-Faire 2013!  This was a lot of fun to try, and it smells great too.  I used Grape, Lemon-Lime and Black Cherry Kool-Aid for the colors.  The Mendhi Medallion and birthday sentiment were clear embossed on watercolor paper and then I dipped into the Kool-Aid.  I also colored some twine with the dye as well.  Definitely something I will try again!

Friday, August 23, 2013

Halloween Class


The next class I am offering is for this cute little Halloween ensemble. The class will take place on Thursday, September 5th at 5:30.  Cost of the class will be $25.00, you will receive a1/2 package of the Witches Brew paper, the Halloween Banner Accessory kit, and I will provide the birdcage and tea light for you. You will need to provide your own frame, I purchased this on at 1/2 off at Hobby Lobby for $7.50.  Please RSVP and have your class fee to me by Thursday, August 29th.  This class is limited to 8people, and 4 people are registered all ready. 

Sunday, August 4, 2013

Celebrate Banner

Here's a little snippet of the Celebrate Banner we will be making on August 15th at 5:30 p.m.  Cost of the class is $30, and you will receive the Build-A-Banner Kit ($19.95 value) with the remaining supplies to take home.  If there are 8 participants for the class, one lucky winner will be the mystery hostess!  As you can see it can be used for a male or female, but girls like prettier stuff, so we will be making some fun embellies to jazz it up when you need to hang it for one of the girls!  Please RSVP by August 8th for the class.

Paper Pumpkin Promo


Offer Dates: July 18, 2013 -August 31, 2013
Offer Details: Use the promotion code PUMPKINDEAL to join Paper Pumpkin before August 31, 2013, and pay only $10 a month* for the first two months.
*plus tax, where applicable. Shipping included!
The Fine Print:
  • For new subscribers only.
  • Promotion applies only to the first two months of a new subscription. After receiving two month's worth, the price for each month's kit will go to the regular price: $19.95.
  • You and your customers need to visit mypaperpumpkin.com to join.
  • You must click "Add Promo Code" and then enter the promo code PUMPKINDEAL in the "Promo Code" field when you sign up on the mypaperpumpkin.com website to take advantage of this promotion.
  • You must join by Saturday, August 31, 2013; 11:50 PM (MT).

Tuesday, July 16, 2013

Road trip Countdown

Wow! I can't believe I leave for convention tomorrow morning! When I registered on April 16th, it didn't seem like it would ever get here! Ok on to the project! As most of you know, I'm driving to Salt Lake with three other demos, so I thought it would be fun to create a banner for everyone to count the days until we leave. Here's the full banner, sorry for the poor pictures, for some reason my computer will not allow me to download pics, so I had to copy and paste! Uggh!
Here's a little closer look at the cute cars!  I used the Top Note die, and cut my papers from cardstock I had printed "Road Trip" on.  Then I stamped the outline and car image from a Papertrey Set, and for the life of me I can't remember the name right now!  Gheesh!  I used the Sweet Girl paper pack from Echo Park to pull my colors, and the new SU In Colors were perfect!  Coastal Cabana & Strawberry Slush, and then the bright yellow from Daffodil Delight.  I hand wrote the numbers for the countdown. They were placed on a ribbon with mini clothes pins, and I also added a scallop circle and retro flower punch I had in my stash.

Here's a close up look for the final day.  This car was paper pieced with the Sweet Girl papers, and I had to add a little bling in the way of rhinestones for headlights!  Ok, I am so sorry, but I can not get this photo to be in the correct layout.  So, better to see the final tag sideways than not at all?!!

Saturday, June 8, 2013

Brand New Stampin' Up Stuff!

Look at all the goodies I just received this week!  I can't wait to sit down and play with all of this crafty goodness!  I have so many ideas flying through my head, hopefully they look as good on paper as they do up there!  I'm very excited to play with the new clay and flower molds, and I have some really cool ideas for stamp club too.  Some of it was free too, have to say that's the best part : )!

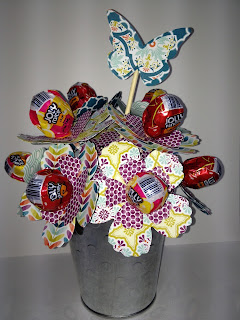
Lollipop Bouquet


As I was typing this title, I had a flashback to Mrs. Marling from the 5th grade! Bouquet was one of the words in our spelling test, and I missed it, so Mrs. Marling gave me the task of creating a bulletin board for the word. To this day, I think of her every time I write the word!
Ok, on to the project! This was a little thank you for the secretary's at Trever's school. I started by cutting my flowers with the SU Fun Flowers die, this is a must have! I love that I can cut multiple layers of paper with one pass. I used the large and small flowers on the die.
I chose two coordinating papers from the Sycamore Street Designer paper. After I cut the flowers out, I used an Exacto knife and cut an X in the center of each flower which allowed me to assemble the flowers on the lollipop sticks without the need for adhesive.  I also used my bone folder and curled each petal up to give a little extra dimension.
I cut extra of the small flower and simply added a brad to the center, these were used in between the larger flowers to help fill the "holes" in the bouquet.  I used just a drop of Tombow multi-adhesive on the end of the brad, and pushed them into the Styrofoam ball.  The container is a small galvanized pail from the Dollar Spot at Target (Love this place!).  I used a 4" Styrofoam ball for the project, and simply pushed it down into the bucket and it held without an adhesive.  Here's a pic of how I started my assembly of the bouquet. I used Jolly Rancher suckers for the centers, I liked the size, however the UPC code isn't the prettiest!
 
I also added a butterfly pick to the bouquet just to give it an extra pop.  I die cut the papers with the SU! Beautiful Butterflies die.  I cut 2 of each size and then used a bamboo skewer and my trusty multi-adhesive!
I did pop dot the center butterfly for some added dimension.
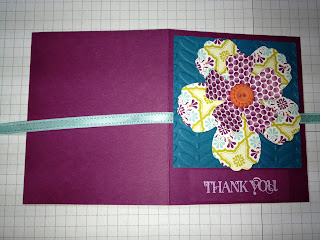
Since these were for adults and most grown-ups do not enjoy suckers, I thought I should add a little chocolate to the mix!  I thought it would be fun to make a pocket card to hold my little chocolate bar, and it would also serve as my thank you card too!
I started with a 4 1/4" x 10 3/4" piece of Rich Razzleberry cardstock.  I scored at 3 1/2", 7", and 7 1/4". I folded back the section to the right of the last score, and this created my pocket for the chocolate.  I then made a diagonal cut across the top of the pocket, added some scalloped trim which was cut from the SU! Tasteful Trim die, and simply used Sticky strip to adhere the side and bottom of the pocket.
For the front, I used a piece of ribbon for my closure, I used a bit of SNAIL to keep it in place, and then added an embossed piece of cardstock measuring 3 1/4" square in Island Indigo.  One final flower topped the whole thing off, with a cute Tangerine Tango button for the center.  I stamped the thank you from Curly Cute in white ink to finish it off.
 
Finally have this post finished : ), I've been trying to finish this for several weeks now.  Apparently my laptop does not want to save pics from my e-mail to it's hard drive!  I even to complete it on my I-pad with no success!  I hope attempt to make your own lollipop bouquet, I would love to see a picture of it!
 

Thursday, March 21, 2013

Tim Holtz Tattered Floral Challenge

Some of you may know I have a bit of a thing for Tim Holtz goodies!  Susan and I signed up for an online class last year, and since the class I have added even more to my stash!  The challenge was to create a project using the Tattered Floral die in the Tim Holtz Sizzix line.  So, I decided I wanted to make a necklace, Tim had shown a beautiful necklace made by Connie Fong.  It was displayed at the CHA show in January.  Now I have to say this is by no means anything as beautiful as her creation, but I like how it turned out just the same!  My little creation is not completely in the Tim Holtz distress style, but I did use some of his techniques.
I started of with some off white muslin, and I cut 4 layers of fabric at once.  I love the thicker Sizzix dies because you can cut almost anything! After I cut the flowers, I used Tim's French Market stamp set to add some pattern to the fabric.  I stamped the images with Timber Brown Staz-On it had to be a permanent ink because I wanted to use some of the distress stains and paints to add some pretty colors to the layers.  Here are my stamped layers and the colors I used to "mottle" the petals. 

Here's a close up of the flower layers after I added some color to them.  I love how they turned out!  Look at the cool postmark!
And, finally a close up of the finished flower on the necklace. 

Here's a list of the items I used for my project:  Tattered Florals die, French Market stamp set, Peacock Feathers, Picked Raspberry distress inks, and Seedless Preserves distress paint. Idea-ology items: Locket keys, jump rings, philosophy tags, custom fasteners, and baubles.
I can't wait to play some more with all of my new toys!  There are a few other items which were revealed at CHA and rumor has it they will be available the beginning of next month, yippee!