As I was typing this title, I had a flashback to Mrs. Marling from the 5th grade! Bouquet was one of the words in our spelling test, and I missed it, so Mrs. Marling gave me the task of creating a bulletin board for the word. To this day, I think of her every time I write the word!
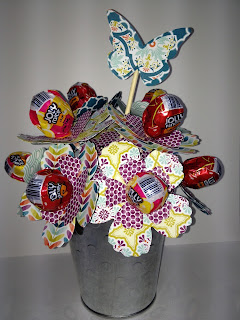
Ok, on to the project! This was a little thank you for the secretary's at Trever's school. I started by cutting my flowers with the SU Fun Flowers die, this is a must have! I love that I can cut multiple layers of paper with one pass. I used the large and small flowers on the die.
I chose two coordinating papers from the Sycamore Street Designer paper. After I cut the flowers out, I used an Exacto knife and cut an X in the center of each flower which allowed me to assemble the flowers on the lollipop sticks without the need for adhesive. I also used my bone folder and curled each petal up to give a little extra dimension.
I cut extra of the small flower and simply added a brad to the center, these were used in between the larger flowers to help fill the "holes" in the bouquet. I used just a drop of Tombow multi-adhesive on the end of the brad, and pushed them into the Styrofoam ball. The container is a small galvanized pail from the Dollar Spot at Target (Love this place!). I used a 4" Styrofoam ball for the project, and simply pushed it down into the bucket and it held without an adhesive. Here's a pic of how I started my assembly of the bouquet. I used Jolly Rancher suckers for the centers, I liked the size, however the UPC code isn't the prettiest!
I also added a butterfly pick to the bouquet just to give it an extra pop. I die cut the papers with the SU! Beautiful Butterflies die. I cut 2 of each size and then used a bamboo skewer and my trusty multi-adhesive!
I did pop dot the center butterfly for some added dimension.
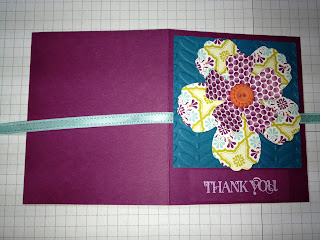
Since these were for adults and most grown-ups do not enjoy suckers, I thought I should add a little chocolate to the mix! I thought it would be fun to make a pocket card to hold my little chocolate bar, and it would also serve as my thank you card too!
I started with a 4 1/4" x 10 3/4" piece of Rich Razzleberry cardstock. I scored at 3 1/2", 7", and 7 1/4". I folded back the section to the right of the last score, and this created my pocket for the chocolate. I then made a diagonal cut across the top of the pocket, added some scalloped trim which was cut from the SU! Tasteful Trim die, and simply used Sticky strip to adhere the side and bottom of the pocket.
For the front, I used a piece of ribbon for my closure, I used a bit of SNAIL to keep it in place, and then added an embossed piece of cardstock measuring 3 1/4" square in Island Indigo. One final flower topped the whole thing off, with a cute Tangerine Tango button for the center. I stamped the thank you from Curly Cute in white ink to finish it off.
Finally have this post finished : ), I've been trying to finish this for several weeks now. Apparently my laptop does not want to save pics from my e-mail to it's hard drive! I even to complete it on my I-pad with no success! I hope attempt to make your own lollipop bouquet, I would love to see a picture of it!


No comments:
Post a Comment